
Creating a ScrollView in React Native app using the FlatList Component
Embedding a ScrollView in a React Native app can be achieved in different ways. One of the ways is through the use of FlatList components. Also, you can design the flat list view in either a horizontal or vertical way. The task gets much easier when you create the interface with the cross-platform app building framework React Native. In this blog, we will learn the steps of getting the Flat list view for a set of images.
Let’s get started.
Understanding the use of FlatList
FlatList is a component in React Native. It is one of the core components, which you can import from the react-native library. It gives a scrollable view of a list of structured data. The data or items can be in the form of texts, videos, or images. The features that you can get with FlatList include cross-platform, viewability callbacks, Pull Refresh, and ScrollToIndex. You can also get other features but these are the most used features.
Before using this component in your codebase, you need to import from the specified library and then move forward.
While discussing the usage of the FlatList component in the codebase, you should learn about its props. The important props are data and renderItem.
Although renderItem is a prop, you have to use it as a function. The variables embedded in rederItem are separators, index, and item. The index indicates the item’s number and item indicates the elements taken from the data source. We have not used the separators in our project. So we will not discuss it further.
Data is the array. You have to embed a variable. In our case, it is a demo.
Hope you have become familiar with the utility of this component (FlatList), let’s learn about the prerequisites criteria.These are the criteria that developers of a React Native app development company usually follow.
What are the prerequisite criteria for the project?
There are two tasks that you have to complete before moving forward with the codebase of the project.
These are as follows.
- Set up the React native environment- It is the most important task if you want to consider React Native and use it further to build projects. For this, you have to get software like Node.js, Android Studio, and VS Code Editor. You can check online resources such as YouTube videos if you need detailed steps. Also, consider the environment for React Native CLI and not for Expo CLI.
- Create a template- Here, you have to make a template, which has to be React Native-based. As we will move forward in this current project, we will need this template to add the codebase for the FlatList view.
Consider the following steps for making this template.
Make a folder on your home screen→ open this folder → open command prompt from this folder → run npx react-native init Flatlist_view –version 0.68.1→ your template is successfully built.
Open the code editor from this FlatList_view template and start building the code syntax for the present project of the FlatList interface.
Designing the codebase for the scrollable FlatList view
Get the components from a specific React Native library. Here, we will be using StyleSheet, Text, FlatList, TouchableOpacity, View, and image. Also, you have to take this from the react-native library. This is how you can arrange this. Refer to image 1.
![]()
Image 1
Now, you have to add the source of items that you want to display on your app in a list view. I have considered a variable demo under which I have added 11 images. If you want to display images in a list view, you have to create objects for each image like the way I have done in my project. For each image, I have added a specific id, name, and source. Refer to the syntax mentioned in image 2.

Image 2
A paginationData function is used in this code. Here, an alert message is created which will show the text of ‘Reload Data’ when the users will scroll down the list end. Since you are dealing with a limited data source, you can design the code in this manner. However, if you add an API key and link your project with a web server, which has a massive volume of data, you have to only create the ‘Reload’ notification to call more items on the screen.
Refer to image 3.

Image 3

Image 4
The App is the main function of our project. You can design the scrollView in it. First, return the View and also a Text component. The View components hold the container with some styling parameters. The Text component defines a text element at the header. It shows ‘FlatList Implementation’.
The code uses the FlatList component to call the data source and arrange the item in two columns. Note that, we have arranged the images in the column.
If you want to arrange it horizontally, you have to delete the codeline mentioned in the 24 and 25 lines (image 4) and add Horizontal in its place. Also, save the process.

Image 5
The code renders a list of items with pagination. Also, it uses the TouchableOpacity component to create a button that when tapped, shows the image.

Image 6
Finally, you have to export the App. Consider image 6.

Image 7
Consider the StyleSheet component to move forward in the codebase. You have to add specific styling parameters to design the Header_Text and container. You can refer to image 7.
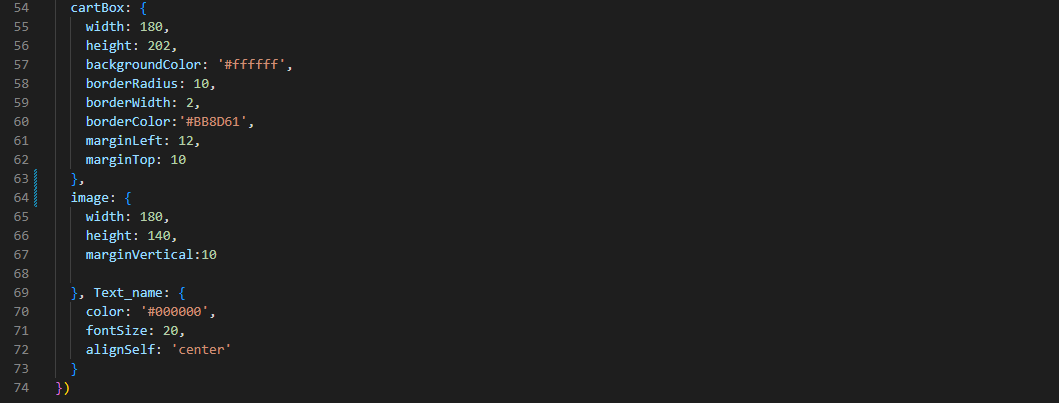
Image 8
Lastly, repeat the same for CartBox, Text_name, and Image. However, you have to add different styling parameters for each object. You can refer to the process I have implemented in my project.
Now that we have created the project, now, we will execute it to check whether it is running properly or not.
Steps to run the program on a device
You can run the program on an emulator. For this, you have to go to the cmd. Note that you have to open it from your built app folder. Then run npm install and then npx react-native run-android. This way, you can run the program and get the real interface of your project.
Consider the output for the current project in image 9.
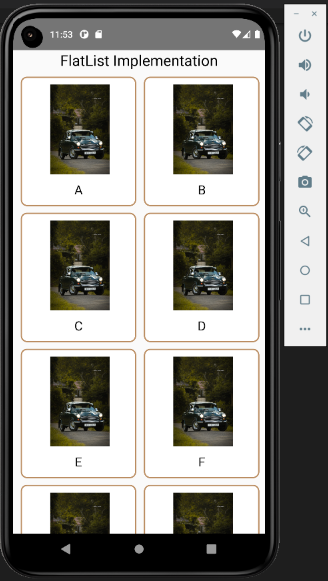
Image 9
For the list view in horizontal form, consider the output shown in image 10.
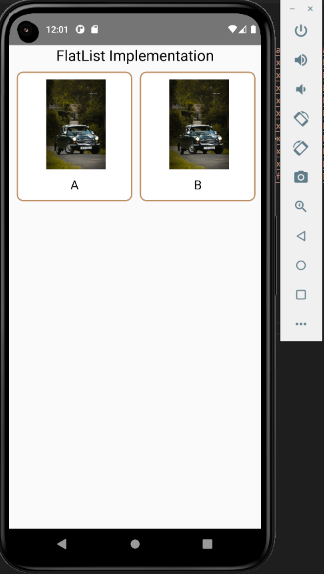
Image 10
This is all about creating the ScrollView in React Native app using the FlatList component. The main criteria of this project are to use the FlatList component and add the data source.